

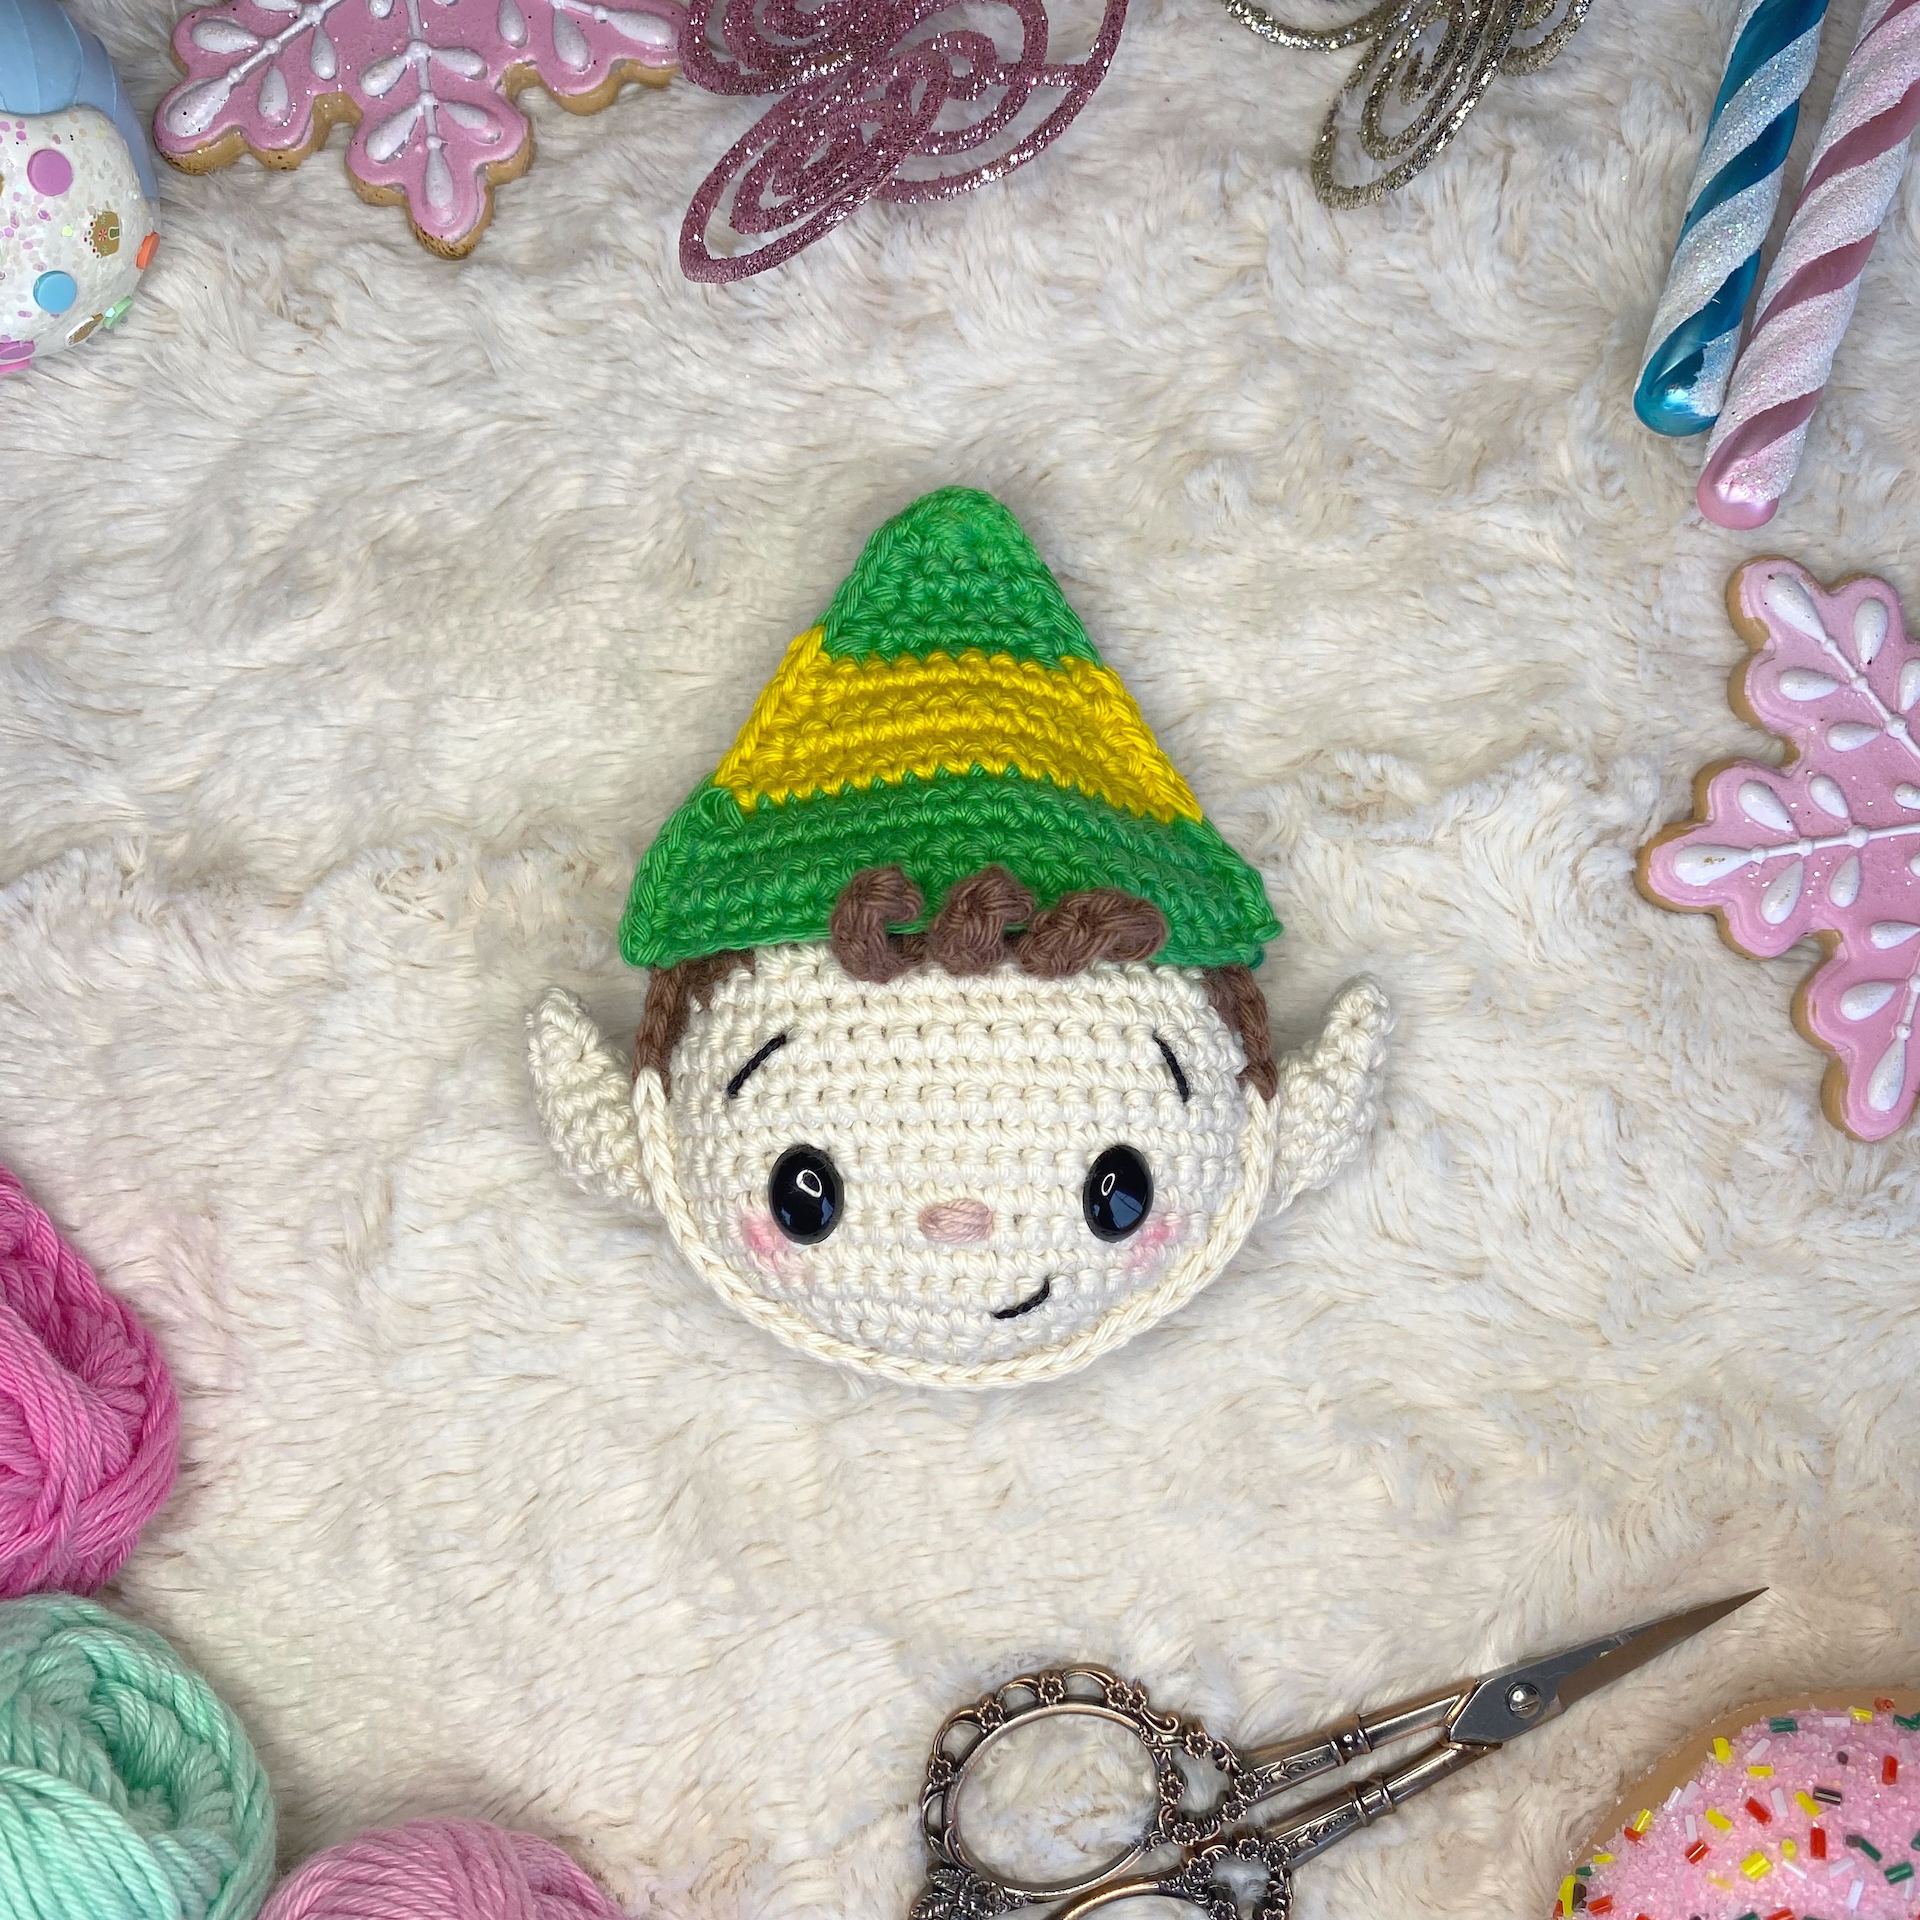
Hello, friends! I am sharing a new free crochet pattern today for an Elf Ornament!
The best part about this pattern is that you can choose any hair colour and any colour and style of hat to make a custom elf! Make an elf version of your friends or family, or crochet the perfect hat to match your decor! That’s exactly what I did; I dressed up my elf with the pink striped hat and hung him on my Candyland-themed tree. He fits right in! Maybe you want to make a Buddy the Elf for a huge Elf movie fan? Maybe there’s a certain dentist elf that you need to add to your Rudolph collection? ;D Or maybe a classic red and green elf is more your jam. So many options!
The Details
As usual, this pattern is made in the same style as my Ragdoll patterns; separate pieces worked in flat rows and then joined together to give them that unique 2-D look.
The finished measurements are approximately 12cm/5″ from top to bottom.
Notes:
- The panels are worked from the bottom up in flat rows.
- The face and curls are stitched onto the front panel before assembly.
- The panels are single crocheted together to join them and then stuffed.
- The ears are worked in continuous rounds and are attached after assembly of the panels.
- The hat is worked in flat panels and joined with sc.
- When changing colours, insert your hook into the stitch for the last stitch of Colour X and pull up a loop. Then, with Colour Y, yarn over and complete the stitch by pulling through both loops with Colour Y. Drop working yarn in Colour X and continue with Colour Y. Pick your Colour X yarn back up again when you need it.
- Always drop your yarn on the wrong side of your panel. For the front panel, when working an odd-numbered row (row 1, 3, 5, etc), the right side of the panel will be facing you. When working an even-numbered row, the wrong side will be facing you. This is reversed for the back panel.
- Ch 1 at the end of each row does not count as a stitch.
Let’s get started! (Or Pin/Shop for later!)


If you’d prefer a downloadable or printable version of this pattern, an inexpensive, formatted, and ad-free PDF can be purchased the following ways:
Materials:
(Affiliate links coming at you!)
- 2.75mm hook for main (I use THESE hooks!);
- Main Colour (MC) – Hobbii Friends Cotton 8/6 in color 03 (Oatmilk) for skin (less than 50g);
- Contrasting Colour (CC) – Hobbii Rainbow Cotton 8/6 in color 07 (Brown) for hair (less than 50g);
- Rainbow Cotton 8/6 in color 46 (Old Rose) for nose (small amount);
- Green/Yellow Hat:
- Hobbii Rainbow Cotton 8/6 in color 55 (Sunny Yellow) (less than 50g);
- Hobbii Friends Cotton 8/6 in color 103 (Parakeet) (less than 50g);
- Red/Green Hat:
- Hobbii Friends Cotton 8/6 in color 41 (Pomegranate) (less than 50g);
- Hobbii Friends Cotton 8/6 in color 105 (Emerald) (less than 50g);
- Pink Striped Hat:
- Hobbii Rainbow Cotton 8/6 in color 62 (Light Pink) (less than 50g);
- Hobbii Rainow Cotton 8/6 in color 44 (Rose) (less than 50g)
- Hobbii Rainbow Cotton 8/6 in color 25 (Pastel Mint) (less than 50g);
- Black crochet thread;
- 9mm Safety eyes;
- Stuffing;
- Tapestry needle.
Terms and Stitches:
Ch – Chain
Slst – Slip stitch
MR – Magic Ring
Sc – Single Crochet
Inc – Increase. Work a regular sc increase
Inc twice – Work a regular sc increase in each of the next 2 sts
Dec – Decrease. Work a regular sc decrease
Dec twice – Work a regular sc decrease two times over the next 4 sts.
Sc3tog – Single crochet three stitches together
Hdc – Half double crochet
Dc – Double crochet
Invisible join – After last st, cut yarn and pull up on the working loop until the yarn tail is pulled all the way through. With tapestry needle, thread yarn tail through the next st from back to front and then down into the centre of the “V” of the last st worked. Pull tight. Weave ends.
Pattern
Front Panel (make 1):
Row 1: In MC yarn, ch 8, starting in 2nd ch from hook, sc in each ch (7 sts), ch 1, turn.
Row 2: Inc twice, sc 3, inc twice (11 sts), ch 1, turn.
Row 3: Inc twice, sc 7, inc twice (15 sts), ch 1, turn.
Row 4: Inc, sc 13, inc (17 sts), ch 1, turn.
Row 5: Inc, sc 15, inc (19 sts), ch 1, turn.
Row 6: Sc in each st across (19 sts), ch 1, turn.
Row 7: Inc, sc 17, inc (21 sts), ch 1, turn.
Rows 8-10: Sc in each st across (21 sts), ch 1, turn.
Start colourwork in next row.
Rows 11-12: In CC sc 1, in MC sc 19, in CC sc 1 (21 sts), ch 1, turn.
Row 13: Sc 2, in MC sc 17, in CC sc 2 (21 sts), ch 1, turn.
Row 14: Sc 3, in MC sc 15, in CC sc 3 (21 sts), ch 1, turn.
Row 15: Dec, sc 3, in MC sc 11, in CC sc 3, dec (19 sts), ch 1, turn.
Remaining rows are worked entirely in CC.
Row 16: Sc in each st across (19 sts), ch 1, turn.
Row 17: Dec, sc 15, dec (17 sts), ch 1, turn.
Row 18: Dec, sc 13, dec (15 sts), ch 1, turn.
Row 19: Dec twice, sc 7, dec twice (11 sts), ch 1, turn.
Row 20: Dec twice, sc 3, dec twice (7 sts), ch 1, turn.
Row 21: Dec, sc 3, dec (5 sts).
Tie off. Weave ends to the back. Set aside.

Back Panel (make 1):
Row 1: In MC yarn, ch 8, starting in 2nd ch from hook, sc in each ch (7 sts), ch 1, turn.
Row 2: Inc twice, sc 3, inc twice (11 sts), ch 1, turn.
Row 3: Inc, in the next st work (sc 1, in CC sc 1) all into the same st, continuing in CC sc 7, in the next st work (sc 1, in MC sc 1) all into the same st, inc (15 sts), ch 1, turn.
Row 4: Inc, in CC sc 13, in MC inc (17 sts), ch 1, turn.
All remaining rows are worked entirely in CC.
Row 5: In CC inc, sc 15, inc (19 sts), ch 1, turn.
Row 6: Sc in each st across (19 sts), ch 1, turn.
Row 7: Inc, sc 17, inc (21 sts), ch 1, turn.
Rows 8-14: Sc in each st across (21 sts), ch 1, turn.
Row 15: Dec, sc 17, dec (19 sts), ch 1, turn.
Row 16: Sc in each st across (19 sts), ch 1, turn.
Row 17: Dec, sc 15, dec (17 sts), ch 1, turn.
Row 18: Dec, sc 13, dec (15 sts), ch 1, turn.
Row 19: Dec twice, sc 7, dec twice (11 sts), ch 1, turn.
Row 20: Dec twice, sc 3, dec twice (7 sts), ch 1, turn.
Row 21: Dec, sc 3, dec (5 sts).
Tie off. Weave ends to the back. Set aside.
Ears (make 2):
Rnd 1: In MC work 4 sc into a MR (4 sts)
Rnd 2: Sc in each st around (4 sts)
Rnd 3: Inc in first st, sc 3 (5 sts)
Rnd 4: Inc twice, sc 3 (7 sts)
Rnd 5: Inc in each of the next 3 sts, sc 4 (10 sts)
Rnd 6: Sc in each st around (10 sts)
Rnd 7: Sc 6, dec twice (8 sts)
Rnd 8: Dec, sc 4, dec (6 sts)
Tie off. No need to stuff. Flatten and set aside.


Curls (make 3):
Row 1: In CC, ch 11, starting in 2nd ch from hook, sc in each st (10 sts)
Tie off. Twist the ends to curl them. Set aside.
Hat Panel (make 2):
Row 1: Ch 20, starting in 2nd ch from hook, sc in each ch across (19 sts), ch 1, turn.
Rows 2-3: Sc in each st across (19 sts), ch 1, turn.
Row 4: Dec, sc 15, dec (17 sts), ch 1, turn.
Row 5: Dec, sc 13, dec (15 sts), ch 1, turn.
Row 6: Sc in each st across (15 sts), ch 1, turn.
Row 7: Dec, sc 11, dec (13 sts), ch 1, turn.
Row 8: Dec, sc 9, dec (11 sts), ch 1, turn.
Row 9: Sc in each st across (11 sts), ch 1, turn.
Row 10: Dec, sc 7, dec (9 sts), ch 1, turn.
Row 11: Dec, sc 5, dec (7 sts), ch 1, turn.
Row 12: Dec, sc 3, dec (5 sts), ch 1, turn.
Row 13: Sc in each st across (5 sts), ch 1, turn.
Row 14: Dec, sc 1, dec (3 sts), ch 1, turn.
Row 15: Sc3tog (1 st).
Tie off. With the front of the hat facing you, insert your hook into the lower right hand corner and single crochet around two sides to join them, leaving the bottom open. Work 4 sc into the top stitch to crochet around the tip of the hat.
For the Green/Yellow hat: Work 5 rows in green, then 5 rows in yellow, then 5 rows in green.
For the Pink Striped hat: Alternate working 3 rows in dark pink and 3 rows in light pink.
For the multicolour hat: Work 2 rows of each colour.
Optional Hat Trim:
Turn hat so the pointed end is downward. Insert your hook into the side of the hat where the two panels are joined and join yarn.
Row 1: Sc in each ch around and work an inc at each join (42 sts), join with a slst, ch 1, turn.
Row 2: *Sc, sk 2 sts, 5 dc into the next st, sk 2 sts, repeat from * 6 more times, slst to beginning st.
Tie off. Weave ends. Fold the brim upwards onto the hat. Stitch down in a couple of places to secure if needed.


Move on to assembly below!


Assembly:
- Using contrasting colour yarn, stitch the three curls onto the middle of the front panel between rows 19 and 20. When laying flat, the curls should extend down below the hairline by 4 or 5 rows. Weave ends.
- Insert 9mm safety eyes into the front panel between rows 7 and 8 with approximately 9 or 10 sts between them.
- With a tapestry needle and colour “Old Rose”, stitch a nose between the eyes at row 6.
- With black crochet thread or fine weight yarn, stitch a mouth at row 4 by stitching diagonally across two stitches.
- With black crochet thread or fine weight yarn, stitch eyebrows above each eye by stitching diagonally over rows 10-12.
- Add rosy cheeks if desired using pink yarn, or apply blush/pastel chalk.
- Place both panels together, matching up all rows and with the front facing you. Starting near the top on the left side, begin attaching the panels together by inserting your hook through both panels and single crocheting around the outside edge of the panels starting in contrasting colour. Switch to main colour when you reach the skin. Crochet around, switching back to contrasting colour for the hair when needed. When only the top remains open, stuff firmly. Continue crocheting around and close with an invisible join. Weave ends.
- Stitch ears to either side of the face at rows 6-10 (i.e. just below where the hair starts). Weave ends.
- Place hat on elf and adjust curls so that they curl up over the brim of the hat. Stitch hat in place in a few places around (or pin in place if you don’t want to permanently attach the hat).
- Attach a hanging loop to the top of the hat.
You’re done!

Keep in touch on the Spin a Yarn Crochet Facebook Page! Feel free to post and share pictures of your finished items and/or links to your shops. Be sure to also follow us on Instagram and hashtag your creations using #spinayarncrochet!
The information and photos in this post are the sole copyrighted property of Spin a Yarn Crochet. You may not copy and paste or reproduce any part of the information contained herein electronically, verbally, written or otherwise. This includes translations.
You may make and sell products from our patterns but we ask that you please link back to this post.
We are a participant in the Amazon Services LLC Associates Program. It is an affiliate advertising program designed to provide a means for us to earn fees by linking to Amazon.com and affiliated sites at no added cost to you. As such, this post may contain affiliate links. This means Spin a Yarn Crochet may receive some compensation if you click a link and purchase something that we have recommended. Thank you for your support!


